KRAFTS AND MORE!

Contents of this blog: Original hand crafted wood items, crochet, sewing, knitting, painting, drawing and also some How to's and craft tips thrown in! Enjoy!

Tuesday, March 27, 2012

Easy String Egg Ornaments and painted eggs

My cousin posted this on Face Book this morning and got me right in the mood for Easter Crafts!  These eggs were made by wrapping string around slightly inflated balloons.  Use watered down paste or doily stiffener to adhere and then break the balloon when finished.  I love this idea and using pastel crochet #30 thread would make them so pretty!  Okay, and I just found out the original directions used pastel embroidery floss!  And instead of glue or doily stiffener, she used liquid starch that you can buy in the grocery store.  She also filled the balloon with a little water instead of inflating.

I also remembered that I used to make eggs of quilling paper by gluing curled shredded pastel paper to plastic eggs that open.  Cover each half and when dry, pull from plastic egg and glue the two paper deco halves together.  I am sorry I do not have a photo for you but I am sure you can do it without! And here are some ideas for that I found on line.  These are glued to styrofoam eggs:
They are quite beautiful, aren't they?


Lastly, I also made faux Ukranian tradition waxed and dyed eggs by painting a black background on a real blown egg and then painting design or flowers on them.  I do have a picture of ones I created in the last few years.

Eggs in my china cabinet, real blown eggs painted, ones ready to be painted and a Cardinal nest with eggs abandoned last year.

Painted eggs with acrylics on black background and then sprayed with lacquer. I apologize for the through the glass blurred photo.

A nice touch for Easter and Spring decor:  The Cardinal's nest with 2 whole and one broken egg.  This was abandoned last spring.  Notice how the nest is woven with brown pine needles and wide strands of weed grass.  So fascinating!
Okay, those are my shares for Spring and Easter crafting for now, have a wonderful day.  Please share your ideas with me, also and I will post them for you on here :)


My crafty heart to yours...

Sunday, February 19, 2012

Craft Storage Bins

Good rainy Sunday afternoon to you!  A gentle spring rain is falling on the pond and a damp chill is in the air.... But I am cozy here in the den and just wanted to show you a storage find I purchased a few weeks ago.  Fabric storage bins that are collapsible!  They came 3 to a package for just $3.00 a pack.  I was tickled as baskets and storage bins that are attractive are so expensive.  

As you can see these are both attractive and roomy!  When I have cleaned out my craft stash and sorted materials, I will take another picture for you.  I hope your Sunday is blessed with every good thing.  God is good, life is good....


My crafty heart to yours...

Tuesday, February 14, 2012

Sharing a beautiful Dog portrait...


This is so amazing and I only wish I could draw like this--so beautiful.  If you are an artist, it is a lesson and if you are not, just enjoy!!

Tuesday, January 31, 2012

My Two Best friends were Carpenters....

My wonderful sweet husband succumbed to the horrible cancer Multiple Myeloma on Thursday, January 26, 2011 at 5:15pm.at home with his loving family.  He died an agonizing 12 hour death and he held my hand until the last breath.  I gave in to have Hospice help the last 3 days when I could no longer lift him.  They were absolutely wonderful and supportive and I cannot praise them enough.  They never took his care away from me but supported me with medical knowledge as well as loving hugs.  We all bonded including Bill in just those short 3 days of knowing one another.  When Bill passed, they wept right along with us.

Bill doing what he loved best!  Taken on Owasco Lake in Auburn NY several fall seasons ago...
And here is a picture of my honey, the carpenter busy in the shed  in the 90's.  He was always building and creating.

The hammer is still, the saw is silent.  The house is filled with his love though and I feel its warmth all around me.  Thanking all of you who have traveled this journey with us.  You saved me when I was lonely, had questions or just depressed.  You shared your own experiences and always tried to make Bill and myself feel better.  What would I have done without my blogs when we were housebound?  Thank you sweet friends, I love you all.  Hugs, Kerrie


I wrote a song to him once about MY BEST FRIEND IS A CARPENTER....  And it is about the Lord but also about my Carpenter Bill.  I will share with you some day....

Monday, January 9, 2012

Nifty Book Marks

Are you familiar with Pinterest??  It is a site where people pin their favorite things in categories and if you like one of the pictures, you can repin it.  Several have repinned one of my Myrtle Beach ocean pictures.  Well, anyway, I found the neatest Book Mark idea on there.


These are made with paint samples!  For children, you can punch a heart out each time they finish reading a book, isn't that neat?  Or just make for friends and slip them in an envelope the next time you write or send a card to them.
  Punch a hole in the top for the colorful ribbon that will hang outside the book pages.  I just love this idea and can't wait to make some.


Here is one I made last year for a book plate.  Wanting to share again.  Right click on image to save and Print out on sticky backed paper that can be peeled to adhere to the frontispiece page of your books.


My Krafty Heart to yours...

Thanks for visiting today and come back soon!

Friday, November 25, 2011

Easy Ornaments from Fabric Scraps

Nothing personal, but you are all full of Turkey!! ha, ha, ha! to see our silly Thanksgiving tradition go to my Kerrie's Korner SC blog.  We hope your day was wonderful and that you were making new memories....
  We celebrated with only one daughter as everyone was out of town. Later in the afternoon, I was in the mood to make some ornaments that I had seen on line and was experimenting.


This one was very simple!  I just cut some red and white felt into a simple Christmas Tree.  2 small pieces of red and 2 white. I sewed down through the middle of the tree at the same time catching the green ribbon for the hanger in back.  Then I just fanned out the branches!  The back side is flat so it would make a great gift tie-on as well.
Next, I sewed 4 different fabric scraps together in strips about 1/2 inch wide.  I drew a Christmas tree shape lightly on the strips and cut two shapes at once with the pinking sheers.  It has the quilted look on both sides and the ribbon hanger was stitched between the 2 shapes. I stitched over my light pencil shape and then cut with the pinking sheers close to the stitching.  I really like the way these came out and they also would make a good gift tie-on and ornament.  I hung them on the mantle pegs to see what they looked like.

Our daughter liked them so much, they all went home with her-ha!  She said she would treasure them as they are special...
  I love creating things and I know all of you do, also.  Very little skill is needed for these projects and you could even glue the shapes together or sew by hand if you do not have a sewing machine.  Happy Krafting and come again soon!
My Krafty heart to yours...

Friday, November 18, 2011

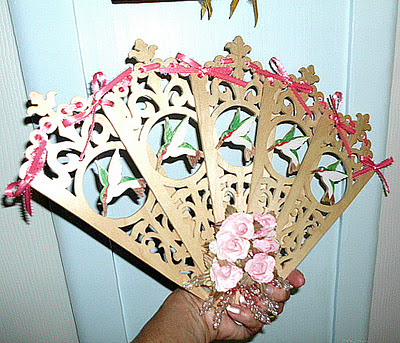
Victorian Fan in Pinks

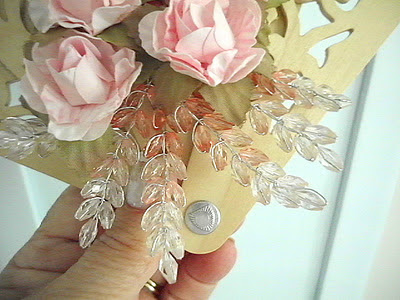
You may have seen other fans we have made like this one I am featuring today.  It is a scroll saw Victorian fan that Bill cut from thin aspen wood.  I did the embellishing with ribbons, fabric flowers, painting the Hummingbirds and bead work.  I just love these fans as they are so elegant and look beautiful on the wall of any room.  This one is for sale in my Etsy Shoppe and it would make a wonderful gift.  Link is in the sidebar.


I am joining Beverly at "Pink Saturday" with this post.  If you love Pink, you will have a ball visiting all the entries for this Pink Saturday, come on and join in!  


Here is a how to that I made by accident! Ha!
I was trying to make a snow flake that I had seen on some one's blog but the directions were not clear.  So while experimenting, I made the cutest Christmas tree that I will use on top of gifts or for a banner.  Have not decided if I should put glitter on it or just use different color papers in red green and gold.
First I cut a little square of paper.
I folded it in half and cut slits from the folded side towards the edges.  Then I turned it around and cut slits between the ones I had just cut from the straight edge.
I cut the edge point off at one end to make the pot for the tree and then I opened the paper up and pulled from each end.  And this is what happened!
I love it!  If you pull it out more , it will become dimensional.  These would look so cute in colors on a ribbon tied to a gift!
Happy crafting and come again!  Happy Thanksgiving  coming up Thursday -- Already!
My Krafty heart to yours...