KRAFTS AND MORE!

Contents of this blog: Original hand crafted wood items, crochet, sewing, knitting, painting, drawing and also some How to's and craft tips thrown in! Enjoy!

Friday, November 25, 2011

Easy Ornaments from Fabric Scraps

Nothing personal, but you are all full of Turkey!! ha, ha, ha! to see our silly Thanksgiving tradition go to my Kerrie's Korner SC blog.  We hope your day was wonderful and that you were making new memories....
  We celebrated with only one daughter as everyone was out of town. Later in the afternoon, I was in the mood to make some ornaments that I had seen on line and was experimenting.


This one was very simple!  I just cut some red and white felt into a simple Christmas Tree.  2 small pieces of red and 2 white. I sewed down through the middle of the tree at the same time catching the green ribbon for the hanger in back.  Then I just fanned out the branches!  The back side is flat so it would make a great gift tie-on as well.
Next, I sewed 4 different fabric scraps together in strips about 1/2 inch wide.  I drew a Christmas tree shape lightly on the strips and cut two shapes at once with the pinking sheers.  It has the quilted look on both sides and the ribbon hanger was stitched between the 2 shapes. I stitched over my light pencil shape and then cut with the pinking sheers close to the stitching.  I really like the way these came out and they also would make a good gift tie-on and ornament.  I hung them on the mantle pegs to see what they looked like.

Our daughter liked them so much, they all went home with her-ha!  She said she would treasure them as they are special...
  I love creating things and I know all of you do, also.  Very little skill is needed for these projects and you could even glue the shapes together or sew by hand if you do not have a sewing machine.  Happy Krafting and come again soon!
My Krafty heart to yours...

Friday, November 18, 2011

Victorian Fan in Pinks

You may have seen other fans we have made like this one I am featuring today.  It is a scroll saw Victorian fan that Bill cut from thin aspen wood.  I did the embellishing with ribbons, fabric flowers, painting the Hummingbirds and bead work.  I just love these fans as they are so elegant and look beautiful on the wall of any room.  This one is for sale in my Etsy Shoppe and it would make a wonderful gift.  Link is in the sidebar.


I am joining Beverly at "Pink Saturday" with this post.  If you love Pink, you will have a ball visiting all the entries for this Pink Saturday, come on and join in!  


Here is a how to that I made by accident! Ha!
I was trying to make a snow flake that I had seen on some one's blog but the directions were not clear.  So while experimenting, I made the cutest Christmas tree that I will use on top of gifts or for a banner.  Have not decided if I should put glitter on it or just use different color papers in red green and gold.
First I cut a little square of paper.
I folded it in half and cut slits from the folded side towards the edges.  Then I turned it around and cut slits between the ones I had just cut from the straight edge.
I cut the edge point off at one end to make the pot for the tree and then I opened the paper up and pulled from each end.  And this is what happened!
I love it!  If you pull it out more , it will become dimensional.  These would look so cute in colors on a ribbon tied to a gift!
Happy crafting and come again!  Happy Thanksgiving  coming up Thursday -- Already!
My Krafty heart to yours...

Monday, November 7, 2011

Ornament-Easy

This is a super simple craft and a recycle.  Most everything we buy comes in clear molded plastic packaging.  This one had AA batteries in it.  I cut the trim where it was glued to the cardboard and this made a very nice little recessed frame.  I used a vintage Christmas graphic from the Graphics Fairy ( all graphics are free and you can look for graphics by category or holiday) I glued a lavender piece of paper to the back of the graphic.  I used clear adhesive photo corners to put the card in and pressed at the corners onto the plastic frame.

Measures 3 1/2 X 3"


I then enhanced the figure by going over her details with jell pens. Then I used the little Christmas Tree and snowman that were from the Dollar Tree that came in a package with snow flakes, trees and snowmen all in one package! I put some snow flakes on the back of the ornament with a little stick glue. I used a small hole punch to make the holes to put the green ribbon hanger through and tied a bow at the top.
Then I wrote Noel down the left side of the graphic. This is a great project for
children, too. You can print several copies of the graphic and use for card making, too.
I would love to see what you are inspired to do with a little recycled frame like this one. Happy Krafting and thanks for coming!!

This was a fun project taking only 15 minutes.
My Krafty Heart to yours...

Friday, November 4, 2011

Napkin Rings from Towel Roll

Hello Crafters!  Here is an easy napkin ring tutorial.  Make for yourself or for gifts.

When your paper towel roll is empty, take the cardboard roller and cut about 2 inch wide pieces.  This roll made 8 rings.  Next I took some fall Apple fabric from my stash and cut strips a little wider than each ring and used white tacky glue to paste onto the ring.


Then I cut a smaller piece of fabric for the inside of the ring and glued that down.   And then I let the glue dry overnight.


   Add a white napkin and now you have your own designed napkin rings!  I used "Aleene's Okay to Wash It" glue so the napkin rings can be moist cloth cleaned if stained.

You can also make napkins rings with Christmas print, which I also have in my stash and I plan to make aprons from both the apple and the Christmas print-NEXT!


I have been busy crocheting things for my Etsy Shop: Scarves, dish cloths and a darling crocheted Teddy Bear!  You can buy from this page by clicking Buy Now in my side bar or go to our Etsy Shop site.
Set of 3 crocheted dishcloths
Sweet crocheted Teddy Bear with Polka Dot ribbon 8" tall.


Detail of button features.  My own original
creation.
He is so soft and cuddly,  great gift for teens.  Not recommended for toddlers as they put toys in their mouth and could be a choking hazard.

Fluffiest Pink Pom Pom scarf
Lovely white/green/blue variegated Bernat Pipsqueak yarn.  So soft and fluffy! 100% Acrylic.
My bust of Beetoven makes a perfect model for the scarves-ha!

Me modeling this scarf...
Thank you so much for coming today and do come again soon!  I love comments, please leave one for us.  Till next time, have great crafting days!!

My Krafty Heart to Yours...

Friday, October 14, 2011

Paper Pom Poms

Today I am sharing a craft from the Sewing Loft.  I can't wait to try them and so wanted to share with you right away.  For this time of year I was thinking of lightly spray painting with orange paint.  I hope you make some and send me your results.  Have fun!

Today's craft is super simple. I mean really simple & no cost. The kids made them with me so, they were super fun!!
Let's face it, we all have news paper hanging around the house but what do you do with it? Since my recycling bin was full and the girls were looking for a craft project... the paper pom pom was put into action.
These can be made any size and can be used in so many ways.

Party Decor
Garland
Flowers
Pretty Packaging
Holiday Ornaments
My girls like the party decor.. So that will be the focus for today's craft!
This project is for sewers of all levels.
Skill Level- 1 Button

Materials:
Newspaper
Craft Paint or Watercolors & Brush (Or Orange and yellow and red spray paint.)
Needle
Thread
Scissors
Basic instructions:
Cut many squares of news paper. (*If you have a rotary cutter, you can cut several layers of paper at a time. )

Then I handed the squares off to the girls and let the painting begin! After a quick dry in the sun, you are ready to move on to the next step.
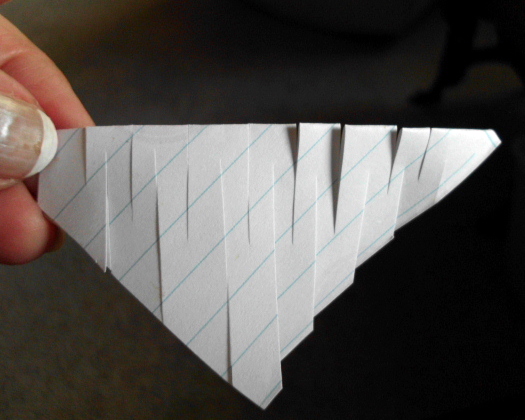
Fold the paper squares as photos. I folded 15 to create my pom pom.
With needle and thread (approx 20" long), stitch through the pointed corner of each petal.  Be sure to leave approx 10" of thread on each side for hanging.
Repeat the process. For pom poms in photo, I used around 15 petals, 5" square.
Tie in knot.
Pull apart each petal and "fluff".
They are not as light and fluffy as tissue paper poms but these pom poms are a fun way to drama above any child's party table.

For More ideas, visit the Sewing Loft http://thesewingloftblog.com.  Happy Fall Crafting!

My crafty heart to yours...

Wednesday, October 5, 2011

Nice Halloween Cat

HERE IS A NICE HALLOWEEN CAT!  Use for greeting card or decoration.  Just right click to copy.  Again, this is from The Graphics Fairy.
Isn't he cute?  You could also use for pasting on treat bags, or for a banner when printing out several copies.  If you right click you can also print right from this page.

Sorry that this is all I have for today.  Hubby had to have 2 pints of blood today at the hospital and the transfusion took 6 1/2 hours, all told!  The day is shot but it is still sunny and a wonderful 73 degrees so not complaining!  I would love you to create with this image and send me a pick, thanks!!

My Krafty Heart to Yours...

Tuesday, September 27, 2011

Halloween fun Decorations


 I am sorry for not posting sooner.  We went camping for 3 days last week while hubby was off chemo.  It was wonderful to get away for a few days with NO Dr. appointments! 
   I thought I better get a move on and share some Halloween decorations with you so you can make cards, banners, or whatever with these wonderful graphics from the Graphics Fairy There is no other site with so many free graphics anywhere!
Right click to copy or go to "file" at the top of your page and choose "save picture as".  I save mine to my picture file and when the season is over, I delete them later.


And here is a gorgeous butterfly with Autumn colors!

Suggestions for use for graphics.  Put them on lace pumpkin doilies and make cards or banners, gift tags, print as iron on's for T-shirts, etc.

I would love to see what you do with them!

graphics cut out and ready to glue on lace pumpkin doilies.

Lovely Butterfly.  For 3-D effect cut out 2 and glue them together at the feet of the butterfly.
And this witch with the moon and bat would look great on a banner for a party or just for Halloween decorating.  Or photograph and make copies for Halloween greeting cards.

Thanks for coming and do come again soon.  If you have time, check out my other blogs.  My most recent blog (listed in sidebar) is my original poetry.

My Krafty heart to yours...


The above graphics are taken from vintage post cards, I love them!