KRAFTS AND MORE!

Contents of this blog: Original hand crafted wood items, crochet, sewing, knitting, painting, drawing and also some How to's and craft tips thrown in! Enjoy!

Thursday, December 23, 2010

MUG RUGS AND MORE...

Sewing in the living room.
Making some last minute mug
rugs, gift bags, and angels from Lace.

I used scraps of Material from other projects to make the mug rugs (for put-
ing your mug on with a snack.)  They are washable and have thin batting
between the layers. Angel bodies are just gathered lace and eyelet trim. You can use a pom-pom for the face and use as a gift tie on,  put a pin backing on it, or hang on the tree. The little gift sac is enhanced with a free graphic from the Graphics Fairy. I just cut oblongs without a pattern for these and rounded the bottoms when sewing the mug rugs for the guys and just stitched them with square corners for the gals.

The Deer mug rugs are for my son-in-law and grandson who hunt. The blue Christmas
print is for my granddaughter and I quilted a tree shape on it. The beige with quilt square is for one of my daughters.
Here's a great idea, I wanted to display the candy canes and I decided to use my vintage green flower frog!  I just love the way it looks and worked perfectly!


I gathered the sewing scraps
for making the wax paper gift
wrap.  I was just experiment-
ing but want to try some more
with freezer paper for the back layer and using flower petals, etc. for more elegant paper.


I used a large man's handkerchief to press the layers together so you do not get wax on the iron.

Add caption


I just randomly put the scraps between layers.  This makes
clear wrap.

Thanks for stopping by!
Come again soon and when you have time, please visit my other blogs whose links are in the sidebar.  MERRY CHRISTMAS TO ALL MY BLOGGING FRIENDS!
♥KERRIE♥
My crafty heart to yours....

Monday, December 20, 2010

Quick Wrapping paper tip...

Running out of Christmas Wrap?  This morning when I was suffering from sleep deprivation (Ha!) I watched HGTV around 5 a.m.  The gal showed how to make wrapping paper with wax paper that you buy on the roll for the kitchen. 

She put bits of string or yarn across the paper, put a second paper on top and Ironed using a piece of cloth over the top.  The wax will adhere the two sheets together and you will have clear wrap with the yarn design through it.  She also showed doing this with freezer Paper as the back, thread or yarn on top and then the layer of wax paper.  This made a very nice wrap with the colors of thread and yarn showing nicely on the white background.

So now of course, my mind is whirling thinking of pressed flowers between layers or any other thing I can find; postage stamps?  photos printed out in miniature on regular Xerox paper and cut out?  Etc, Etc!  I am hoping to make some of this paper and I will post for you when done but just had to share right now-ha! 

Saturday, December 18, 2010

Hymnal Page Wreath

I have always wanted to make one of these wreaths that I have seen on other blogs and finally took the time to do it!  I absolutely love it! 

Supplies:
Dollar Store Grape or straw wreath (mine is grape vine)
Graphic of Santa printed out. (Source:  The Graphics Fairy)
Pages from an old hymnal ( you can usually find these at church book sales)

Directions:
Print out your Santa Graphic in the size you desire.  I used a whole typing sheet.

Mount on cardboard ( use sides of cereal box)

Hot glue the wreath to the picture centering Santa.

Cut a hymnal page into quarters

Curl the page piece with your fingers making a cone and glue with glue stick.

Make as many of these cones as you want to fill the wreath.  I used two rows of these.

Then hot glue them onto the wreath in layers. ( I went once around and then made       another row on top of the first one.)

Just use a pipe cleaner wrapped around the top of the wreath for a hanger and finish with a bow placed at whatever point you would like it.

The result:


I have seen so many variations of this wreath and you could make it of any pocketbook pages but it is more meaningful at this time of year with the hymnal pages.
You could make these wreaths any time of year with whatever scene as the graphic in the middle to match the season or holiday.  I think it would make a stunning gift and even in a smaller size.
HAPPY HOLIDAY CRAFTING!!  Come again soon for more ideas, sources and more!
                            ♥KERRIE♥
                            My heart to yours...

Wednesday, December 15, 2010

PIZZA BOX CRECHE...

UH-HUH!  You heard right, I made a creche display from a pizza box.  The box is from a pizza I bought at the grocery store-ha! 
   It already had the arched cutout.  I immediately thought of the manger scene and covered it with Christmas wrapping paper. 
   All the little creche figures are ones I purchased at the dollar store, $1.00 for the set a few years ago. 
>I put colored paper inside the bottom of the box and then raffia for anchoring the figures. 

>I poked a hole in the back and hung the angel with thread under her wings and back through the hole. 

>The candles are from the dollar store also and work on 2 AA batteries. 

>The cow and donkey under the creche were odd pieces I found over the years.

   This project took about 15 minutes - tops!  It makes a cute little display on the bookcase near the front door.  Can you think of any other way you could use the Pizza box??  Maybe a fireside Santa scene?  Or your children could draw figures and cut them out.  Then paste to the back of the box.....


If you make one of these, please send me a picture to feature, I would love that! 


♥KERRIE♥
My heart to yours...

Tuesday, December 7, 2010

MORE HAND MADE CHRISTMAS CARDS

Sharing more hand made cards from Graphic and photographs.
Don't forget to visit previous post for sources for graphics.
The Swan pictures are ones I took in our backyard lake.  I printed them out on regular xerox paper and then drew a bow and holly with gel pens, on the Swan's neck to make him Seasonal.


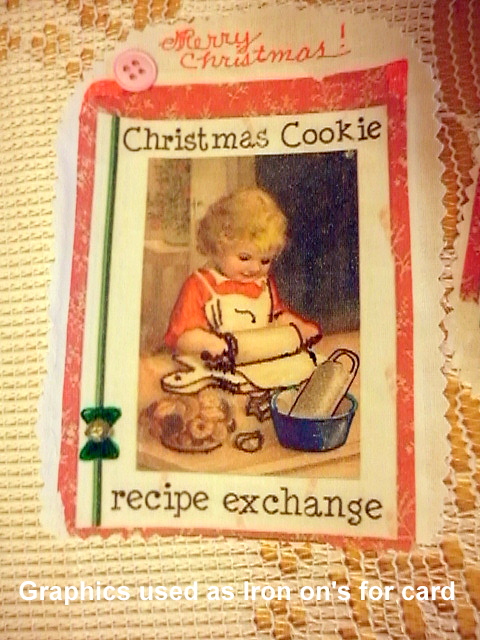
These are vintage graphics that I made into iron-ons on the computer.  My Iron On paper was old though and one of them would not peel off of the fabric (white cotton).  I used it anyway and like the ragged effect.  I then wrote Merry Christmas on them and added a button to embellish.  Not sure if I will glue them onto a card or make a little gift bag of them.


Or you could glue them onto a jar with cookie ingredients or filled with candy, cocoa, tea, coffees or what ever you can think of.
This is the one with the ragged edge, turns out I like this one best! Ha!
These are made from Graphics and cut out with scalloped craft scissors, embellished with gel pens, stickers and matching envelopes with sprays of flowers.  Blank cards can be purchased at any craft store and also at Wal-mart stores.

Thanks so much for visiting and do come again soon.  Leave a comment, I love them,they make my day!


♥KERRIE♥

My Krafty Heart to yours..... 


You can right click and copy this graphic to use.  IT is so sweet...

Monday, December 6, 2010

Christmas Card

This is my card made from images from "The Graphics Fairy". I cut out the image with scalloped craft scissors, glued it to a blank card.  I then enhanced all the colors, e.g. berries and leaves, with my gel ink pens.  I scribbled with my Red pen and then wrote Merry Christmas over the scribbles.
   I cut out a spray of greens from another card and glued it to the side of the card.  I did the same with the envelope by cutting out a spray of blue vine and flowers and glued it to the flap.  I love the way this came out and made two.
  The Graphics Fairy provides free graphics very generously on every subject you can think of!  I just love all the vintage images.  Check it out.

More pictures:


This one has the green sprig at the side.  When using gel pens to enhance, be careful not to smear your image as they remain moist for awhile.  I blotted as I went along and then let them dry well. 
     Another great source for images is Dame Penniwig's Both of these blogsites provide images for your use totally free.  I have used them for years. 

You can buy blank cards at Wal-mart, A.C. Moore or Michael's Craft stores. 

Have a most wonderful day and please come back soon!
Krafty Hugs from KERRIE♥

Friday, December 3, 2010

WATER OR MILK JUG SITTING SANTA

This is my Shelf sitting Santa made from a Milk Jug:
This is how I made him:

You can either paint the legs and boots or cover with felt.  I painted my legs in all black to look like the boots.  I cut the arms in a mitten shape before adding the cotton cuff and felt.  This is one of my favorite decorations and very easy to make.  Children and grandchildren love it and they can easily help with the assembly under supervision.  Questions?  Please comment - Thanks!
     Happy Crafting!
♥KERRIE♥
My heart to yours...