KRAFTS AND MORE!

Contents of this blog: Original hand crafted wood items, crochet, sewing, knitting, painting, drawing and also some How to's and craft tips thrown in! Enjoy!
Showing posts with label Home Decor. Show all posts

Wednesday, January 26, 2011

Creating an Intarsia Hawk

We have a friend who is a licensed trainer of Raptors.  The trainers find wounded birds or young that have lost their parents and rehabilitate them to be released again in the wild.  Bill thought he would make a wood plaque in Intarsia art of a Red-Tailed Hawk for the friend and is working on it right now.  So far, he has cut the many pieces out (approx. 65pcs) and is sanding each one to put them all together like a puzzle.
I caught Bill off guard as he settled in to check out the pieces-ha!  He has been cutting the pieces out for a few days in the shed but it was much too cold for him to stay out there any length of time.
  The pattern is a purchased one.  Copies are made so that you can attach it to the wood with spray adhesive.  Then when sawing the pieces out, you cut paper and all.  Now he is coming inside to remove all the paper and then will be sanding each piece before assembling the hawk.
Note the wing on the upper corner of the board on his lap.  This will be added to the figure of the hawk making it 3-dimensional.


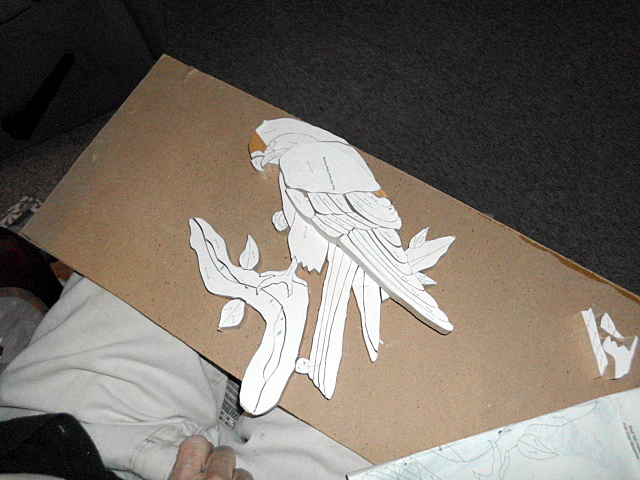
In this picture, the wing is placed on top to show you the depth
of the figure.
Before the hawk can be completed, all of the paper will be removed from the pieces and they will be sanded and slightly beveled. Next they will be stained in different hues to assimilate the colors of the wings as closely as possible. Then the many pieces will be glued together in a mosaic* on a board backing of the same shape.

I will take pictures as the figure progresses.  I cannot wait to see the result!

*Intarsia comes from the Italian word for Mosaic.  The patterns for Intarsia woodworking are put together much like mosaics.  It is very time consuming and requires a great deal of skill.

For pictures of our backyard wildlife and Winter poetry, please visit my Kerrie's Korner, SC site. http://kerrieskorner.blogspot.com

Thank you for coming and come back again soon!

♥KERRIE♥
My Krafty heart to yours....

Wednesday, October 28, 2009

New Craft Helper...


Directions below for a craft wreath.
I have a new craft helper-ha!  This is Isabella, my Ragdoll cat.  I got up from my chair and she thought because I put the basket on the floor that it was just for her!  She took one of the fall leaves out of the basket with her teeth and then laid it down beside the basket.  For more pictures go to http://beaver-kerrie.blogspot.com/

HOW TO MAKE A FABRIC LEAF WREATH OR COASTERS
I purchased a yard of leaf material a few years ago.  I cut out the leaves randomly so that I could put them on a felt backing and blanket stitch around the outside.  I have made several of these as well as coasters every fall.

I cut the leaves with pinking sheers to begin, then hold the felt behind the leaf and cut the felt out for the backing.  I then blanket stitch around the outside of the leaf attaching the felt.  Next, I use gold metalic thread to embroider down the veins on the leaves for accent and detail.  This is a fun lap craft.  You can attach the leaves to a straw wreath and tie with a Raffia Bow or use them individually for coasters.  They also make a nice house-warming gift.
Supplies:
         Red, brown, orange or yellow felt
         Printed leaf fabric
         Black buttonhole thread or embroidery thread 3 strands
         Gold metalic thread
         Hand sewing medium needle
         Optional  straw wreath and Raffia