KRAFTS AND MORE!

Contents of this blog: Original hand crafted wood items, crochet, sewing, knitting, painting, drawing and also some How to's and craft tips thrown in! Enjoy!

Saturday, January 29, 2011

The Red Tailed Hawk continued....

This is the wing that is now sanded and the color will come next.
I love the regalness of his head.  This looks more real than the pattern drawing did! Hubby does such a great job!
Stains used are Mahogany, Light Oak and White Oak.
I love the way he is developing!  He is so beautiful.  Won't be long now and he will be ready for gifting.  The young man who will receive him is stopping by on Sunday to show Bill a real hawk that he is training, I hope to get pictures!

Stop by our other blogs to see pictures of our backyard wildlife, also!
http://kerrieskorner.blogspot.com/  and http://beaver-kerrie.blogspot.com/
    Thanks for stopping and come again soon!

♥KERRIE♥
Our Krafty hearts to yours...

Wednesday, January 26, 2011

Creating an Intarsia Hawk

We have a friend who is a licensed trainer of Raptors.  The trainers find wounded birds or young that have lost their parents and rehabilitate them to be released again in the wild.  Bill thought he would make a wood plaque in Intarsia art of a Red-Tailed Hawk for the friend and is working on it right now.  So far, he has cut the many pieces out (approx. 65pcs) and is sanding each one to put them all together like a puzzle.
I caught Bill off guard as he settled in to check out the pieces-ha!  He has been cutting the pieces out for a few days in the shed but it was much too cold for him to stay out there any length of time.
  The pattern is a purchased one.  Copies are made so that you can attach it to the wood with spray adhesive.  Then when sawing the pieces out, you cut paper and all.  Now he is coming inside to remove all the paper and then will be sanding each piece before assembling the hawk.
Note the wing on the upper corner of the board on his lap.  This will be added to the figure of the hawk making it 3-dimensional.


In this picture, the wing is placed on top to show you the depth
of the figure.
Before the hawk can be completed, all of the paper will be removed from the pieces and they will be sanded and slightly beveled. Next they will be stained in different hues to assimilate the colors of the wings as closely as possible. Then the many pieces will be glued together in a mosaic* on a board backing of the same shape.

I will take pictures as the figure progresses.  I cannot wait to see the result!

*Intarsia comes from the Italian word for Mosaic.  The patterns for Intarsia woodworking are put together much like mosaics.  It is very time consuming and requires a great deal of skill.

For pictures of our backyard wildlife and Winter poetry, please visit my Kerrie's Korner, SC site. http://kerrieskorner.blogspot.com

Thank you for coming and come back again soon!

♥KERRIE♥
My Krafty heart to yours....

Friday, January 21, 2011

MIniature Sketch Winter Scene

I finished the little winter scene sketch with colored pencils instead of paint.  I was happy with the result.
Before:
After:
I think I will have hubby make a little frame for it and put it on a stand...

Tuesday, January 18, 2011

Finished Tissue Box cover

Now I was really happy with my tissue box cover!  With no pattern and never having done this before, I came up with a sunburst design for the sides and it is not so shabby!
On the top of the cover I was just filling in with basic half cross stitch pattern but for the sides I did 3 rows of basic stitch and then started at the center of the block and filled in with long stitch. 
   First from center to corners and then worked inward until the "fan" was complete, then from the longest stitch to the corner downward to the center. 

I turned the box upside down and did the same thing.

I just really loved this variegated rainbow yarn.  It worked up so pretty!
(It is from Wal-mart and is Red heart Brand.)

   When I was finished, I made a cross in the middle.  I learned a lot while experimenting with the pattern and cannot wait to create one for a long tissue box.  FUN!

I did not count canvas squares to fill in the sides, just found the middle and worked from there.
Come back soon to visit, I love having you over!
Here are some vintage actor book marks for you!  They are from the Graphics Fairy blog where Karen provides free images for your use.  A wonderful site!
The envelope image is pasted to the back of the picture with a ribbon between for a lovely book mark.  See more at Karen's.  Check out all the "Brag Monday" entries from blogger's who have used the images in many different ways.


Here is a really cute valentine vintage image for you that is also from Karen's site.  To save any of the images, right click for full size, save to your files and print in the size you want to use.  I would love to see what you do with these! Have a wonderful Day!

♥KERRIE♥
My crafty heart to yours....

Saturday, January 15, 2011

Shaping up the Tissue Box Cover

 Joining the sides with white yarn.  I decided to assemble before stitching...
 Joining all four sides and top.
Outlining the top tissue holeFor some unknown reason the white yarn looks a little pink in this photo.

Beginning to fill in with half cross stitches on the top of the cover.

I filled in each side of the hole one at a time.

The filled in top, I love the colors.  This  time the camera showed the true colors!
Four sides to go-ha!  My arthritis in my hands is killing me!  This is really a fun project and I cannot wait to see it completed!

I received a beautiful reward today from Donna over at "Comin' Home" but I cannot show you until I meet the conditions of the honor-ha!  But you can see it at Donna's!!

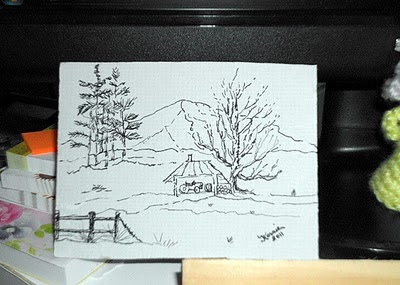
In my spare time, I cannot waste one tiny bit of paper, watercolor board, etc.  So I Inked in this little scene on a scrap 3 1/2 by 4 1/2.  I will water color it soon!

Thanks for visiting and come again soon!
♥KERRIE♥
My crafty heart to yours.....

Wednesday, January 12, 2011

Working with Plastic Canvas and Wood Basket

Gathering supplies and cutting out the pattern for making tissue box covers. Can't wait to get started.  I made the pattern by just laying the side of the tissue box on the plastic canvas and cutting out 4 the same for the sides.  The top I cut and then held over the hole while I traced the oval opening.  Plastic canvas cuts very easily with scissors.  Now that I have my supplies ready, my first step will be to join the four sides together by looping yarn from one long side of the canvas to the other.  I have not decided yet whether it is easier to cover the canvas first and then join or not, what do you experienced crafters suggest?
 I am making this one for the boutique size tissue box.

Okay, now I am ready to begin...

Come back to see the outcome of my first plastic canvas endeaver of the year-ha!

And Hubby just finished making a new Basket design!!  I love this!  We will be offering these for sale soon when I restart the Etsy Shop.

Because of the cradle on the bottom of this basket, it will stand on its own when tilted on its side or on an end.  This will be nice if I want to display fruit or flowers in it as a centerpiece! Fun!  The first one is always mine to keep--lucky me!


Thanks for stopping by!
♥KERRIE♥
My heart to yours...

Tuesday, January 11, 2011

COMIC GET WELL TAGS

I found these great tags to put on tissue boxes in Goodhousekeeping Magazine. Love the one about Moms aren't supposed to get sick. LOL! So true! My photo down load is still not working and it is very frustrating. Nothing stays on the page where I post it now, either. I wish we could get on-line chat support with blogspot.com! Anyhow, I cannot wait to start some new projects for Valentine's Day and for Spring.


At least we can think Spring-ha! Sometimes I think I would rather be looking at snow than the dark brown of winter in the South...
But the beautiful birds that have been coming to all of our backyard feeders brighten our days. To see some of them that are migrating through and some that are here all the time, go to: http:kerrieskorner.blogspot.com


Thanks for visiting and come back soon!!
♥KERRIE♥
My heart to yours...

Thursday, January 6, 2011

Check out Donna's Blog

WHILE I AM CONTEMPLATING MY NEW CRAFT PROJECTS, please visit Donna at Comin' Home .  Donna is the Queen of homemaking arts.  If you have never visited Donna before, you are in for a real treat!  This gal can do it all!  Happiness shines from the faces of her whole family proving that busy hands are happy hands!  I visited some free pattern sites this morning and want to make some really easy hand bags I saw.  When I get started, I will post on here.  I love that I have met so many Christian men and women by blogging.  How great it is to share not only our common interests but also our faiths.  We are one big family tree with God at the top of the graph!!
   I am also going to re-stock my Etsy shop soon.  I have not had much success in selling on Etsy as yet so removed all 20 items to start over.  I am looking to more success in this new year as I keep my prices very modest and know there is a market out there for reasonably priced home made treasures!  That is another reason to visit Donna's site as she has the best advice on buying things reasonably-everything from eye glasses to jewelry!  She also sings and writes songs!  Gotta love this gal!
   So have a wonderful day and thank you for visiting!

Sunday, January 2, 2011

Traditions...


Do you have crafting and sewing traditions that you share with your children??  I always loved that my Mom taught me how to crochet and sew and as an adult, she taught me to knit after I was married!  Every Sunday when my children were small, we would go to Mom's in the afternoon and she always had a new project to show us.  She had all the craft supplies for us to use in addition to any we brought ourselves.  My sister and I and our children, too most of the time, would while away the hours making something neat to take home and show off to Hubby.

I also had a wonderful sister-in-law who taught me to embroider when I was only about 6 or 7 yrs. old!  when my Mom taught me to crochet, she gave me a friend for life.  I always think of her when I pick up a piece to crochet.  She even carved her own crochet hooks from a wood dowel if she did not have the size needed among her stash!  She also taught me to sew and when my children were little, I made many of their clothes.  Mom was the first to make Cabbage Patch dolls when the patterns were available and every grandchild has a sock monkey that she made for them. 
   I taught my girls to crochet and they make beautiful things!!  My Oldest daughter just completed a beautiful crocheted bedspread in the "Slave Pattern" that I had posted last year.  They both also quilt and we all love to craft.  My granddaughters all love crafting, too.  My son and grandson have made things, too.  But the guys prefer more exciting endeavors even though they indulged me at times... But they learn building skills from their DAD/Grandpa.
   I hope you are sharing your skills and crafting with your children.  There is nothing like sharing what you have made, having little chats and giggles and a cup of tea.  I hope my daughters and granddaughters will remember me as I remember my Mom and all the fun we had creating things.
   I am getting my supplies in order and making room on shelves for the new year so I can finish up some started projects and start some new.  Hubby is doing the same.  He has been cleaning out the work shop/shed, making room for storage and throwing away what has not been used for the last 5 years-ha!  I just know we will have something to share very soon to get the year off to a booming start!

I had books all over the house, some by the bed, some on the floor near the bed and some in the living room.  Of course I am reading them all!  Hubby took 3 scrap boards and put them on brackets in one end of a double closet and wa-lah!  Off the floor and neatly on the shelf!  Well, okay, it will be neat-ha!

And hubby's closet is much neater and less crowded now, too!
I have another small walk in closet on the other side of the room where I have my clothes and a few craft projects (2 quilts I am working on and some crochet supplies).  So we feel like we had a good start on organizing for the New Year.  How's it going at your house, would love to hear!

 
Come back soon, thanks for your visit and please leave a comment!

♥KERRIE♥
My heart to yours....