KRAFTS AND MORE!

Contents of this blog: Original hand crafted wood items, crochet, sewing, knitting, painting, drawing and also some How to's and craft tips thrown in! Enjoy!

Friday, March 4, 2011

FUTURE CRAFTY TEACHER....

Our granddaughter, Jessica, is a freshman in college and she is going to be a teacher.  At present, her courses are for teaching children pre-school through 3rd grade.  There is a tremendous amount of creating involved in her assignments and she came to Grandma's to help her put her creations together.  I am so proud of her and all the little crafting together times when she was little have come to fruition-LOL!
  She needed to make a display board with the subject of potty-training and a touch and feel book.  She had everything ready and I just helped with gluing and I did make the whiskers for the Kitten touch and feel-ha!
She scanned the cover of potty training books, laminated them and put them on the tri-fold display board.  She used real pull up diaper cutting it in half, boys and girls panties  and glued them around the book cover in the center.
This is the first page of her touch and feel flip book.  She cut the shoes out after coloring them and put real laces on them.

This one was really fun!  I suggested veggie skewers for the swing frame and she placed them.  She used chain lengths for the swing chains and craft foam for the seats.  I just love its dimensional look and the brightness.
Next, she took plastic life-like grass and cut it into short lengths and glued them down at the bottom.  She turned some sideways and glued them horizontally at the base.  Then grandma thought a lady bug would be nice-ha! So she cut out and drew spots on a piece of craft foam and glued it down.

I love kitty!  She cut him out after coloring him and then used button thread for his whiskers glued on with hot glue.
This is her fence from painted Popsicle sticks, I think it is so cute!  And she cut grass shapes to place be placed in back and front of the sticks...
When the project is completed with a cover and back piece, she will punch the top of the pages with a paper punch and join with rings used for car keys from the craft store.  Then her touch and feel flip book will be complete!

Jessica has wanted to be a teacher from the first moment she went to  pre-school and played teacher all through the years.  I have featured her before as she has an Etsy shop where she sells her home made beaded jewelry.  Thanks for stopping by and do come again.  I think this project would be great for Moms to make when they are potty training, also!  Kids love bright colors and are so proud of themselves when they finally "get it".

TODAY IS JESSICA'S BIRTHDAY!  HAPPY BIRTHDAY JESSICA!!!
♥KERRIE♥
My Krafty heart to yours...

Wednesday, February 23, 2011

Early Easter Craft...

Hey Crafters!  I have created an Egg Graphic for you to use for Greeting cards, place cards, or just for decorating.  Just click on the image to make it larger and then copy to your picture file.  Then you can print it out in what ever size you prefer.  I did lettering on some and left one blank for your own writing.  If you use on a card, just cut the outline of the egg out and paste it.  I created this Egg Graphic with jell pens, permanent fine marker, and drew free hand.  I have never shared this before.  Thanks so much for coming by and I hope you will be able to incorporate this colorful egg into your Easter crafting.

This is reminiscent of beautifully colored eggs that my Mom's friend used to make for her each Easter.  They were made in Ukrainian tradition painting on a real egg with dyes and wax.  They were most beautiful and my mother treasured them.  I have painted on blown eggs to try to simulate these eggs and keep them in a china closet.  They are a good likeness and my friends did not know the difference until I told them-ha!

If you cannot draw ovals free hand, just buy plastic eggs in the $ store, open and draw around the base.  If you cannot draw, simply put dabs of different colored paints on the end of the handle of a paint brush and dab dots on the egg.  This can be quite pretty also.  And there is always ribbon and Rickrack that you can paste as stripes across the egg.  I would love to see how you use my graphic, please send pictures in an e-mail and I will feature them here on the blog! 

♥KERRIE♥
My Krafty Heart to Yours...

Come again soon!   For today's inspirational message, go to http://kerrieshomejournal.blogspot.com

Friday, February 18, 2011

Scratch Board Stallion and Scrollsaw items

   Hello dear crafters!  Today it is beautiful here in sunny South Carolina and 77 degrees at 4:25 p.m.!!  What more could we ask for?
   Hubby has not been feeling well of late due to the treatment for his Multiple Myeloma cancer and being in the house a lot instead of woodworking in the shed, he had to keep busy.  So he did this beautiful Stallion on scratch board and I just love it!
   These are so much fun to do at any age and you can buy kits that are pre-printed with the pattern or if you are artistic, you can just buy the scratch board in different sizes at the craft stores.  This one that hubby did though had no pre-printed pattern so he just used the small picture on the package for reference and I love what he turned out!  It satisfied his creativity for the moment and he has another one of a wolf to do when he is house bound again.
   In the past he has cut out this very beautiful Friend Saying that is on the wall in our den.  The words are all cut out separately with the scroll saw.  He has so much patience doing these very meticulous cuts!  He has also cut the first line of Amazing Grace for me on a note staff!!  I am always amazed at the wonderful detail in his work.

We had planned to make more of these for my Etsy shop (not open at present) but with Bill's treatment causing much pain and lately nausea, he has not been able to enjoy his wood work and also the shed had been too cold for him to work out there when we were having the unusually cold weather here.
And last, but not least, is this beautiful wooden scroll saw fan that he made for me from a purchased pattern.  He also made another one that I will have for sale in my Etsy shop when opened again, that has peach ribbons, bead decoration and flowers.  These are large and make beautiful accent pieces in any room.

I hope you enjoyed seeing some of his projects today and that it is an inspiration for your crafting. 
  Here is my other tissue box holder made for the long boxes from the plastic grid and yarn.
I did not have a pattern for either this one or the boutique one I made and on the long box I just filled in with variegated yarn and used corner to corner stitches.
I was even able to put a little flower cluster on each end by making the flowers first and then filling in with the filler stitches.  This is another fun project and I plan to make more. And PS: I did do all the stitching on the panels this time before joining with the white yarn.  It was much easier to work on and made the back of the work almost as neat as the front.

Come again soon and do visit our other blogs, links are in the sidebar.
♥KERRIE♥
My Krafty Heart to yours...

Thursday, February 3, 2011

Red Tailed Hawk Completed

The red-tailed Hawk in Intarsia is finished by hubby and ready for his owner who will be picking him up.  He measures 10 1/2 inches wide and 11" tall.  He is quite beautiful and we were both pleased with the way he came out.  The top wing was cut out separately from the body parts and glued on afterward.  All 64 pcs. were stained and/or painted first before gluing them together on a base.  Then the details of the feathers, head and eye were painted again.

He does not have a glaring shine like that which is reflecting from my camera flash,  but does have 2 coats of varnish to protect him. 
This was a long project but hubby enjoyed making it for our friend and cannot wait for him to see it in person! 
I hope you enjoyed seeing the hawk's development and if you are a woodworker that this has peaked your interest about working in Intarsia. 

Thank you so much for visiting and please leave a comment for us as we read every one.  Come back soon.


♥KERRIE♥
My Krafty heart to yours....

Tuesday, February 1, 2011

Valentine Low to No Cost Crafts...

Remember my Christmas Wreath with Santa in the middle?  Well, I printed out a valentine from the Graphics Fairy once again and Placed it right over Santa without gluing or harming the Santa print.  Since the wreath is made from pages from an old hymnal, I can keep this up all year just changing the picture in the center for all holidays!  I just love it so much!  I have it hanging in the kitchen on the wash room door.
Here is a close up photo.  Karen at the Graphics Fairy provides a multitude of vintage artwork free for the copying.  She also has Request Thursdays where you can even request graphics!  Do visit her site.
Next, I printed out valentine graphics, cut them out with scalloped craft scissors and strung them on a green ribbon with a glue stick.  I don't know where I will hang it yet but love the result.  Also, I made some book marks from vintage actress photos that were popular way back when with their little envelope under them.  I just loved these too and they came out very nicely.  I simply glued different colored ribbons to the back of them with a loop at the top.

Thanks to the Graphics Fairy, I can be so creative!  Sharing is what it is all about!  Life is good!

Hubby is still working on the Red Tailed Hawk for our friend and I will post when it is finished. 

Here is one from real life that he brought for us to see on Sunday evening.


For more pictures of the Red Tailed Hawk and our Backyard Wildlife, go to my Kerrie's Korner, SC blog.
Do come back soon, we love having you visit! 

♥KERRIE♥
My Krafty heart to yours...

Saturday, January 29, 2011

The Red Tailed Hawk continued....

This is the wing that is now sanded and the color will come next.
I love the regalness of his head.  This looks more real than the pattern drawing did! Hubby does such a great job!
Stains used are Mahogany, Light Oak and White Oak.
I love the way he is developing!  He is so beautiful.  Won't be long now and he will be ready for gifting.  The young man who will receive him is stopping by on Sunday to show Bill a real hawk that he is training, I hope to get pictures!

Stop by our other blogs to see pictures of our backyard wildlife, also!
http://kerrieskorner.blogspot.com/  and http://beaver-kerrie.blogspot.com/
    Thanks for stopping and come again soon!

♥KERRIE♥
Our Krafty hearts to yours...

Wednesday, January 26, 2011

Creating an Intarsia Hawk

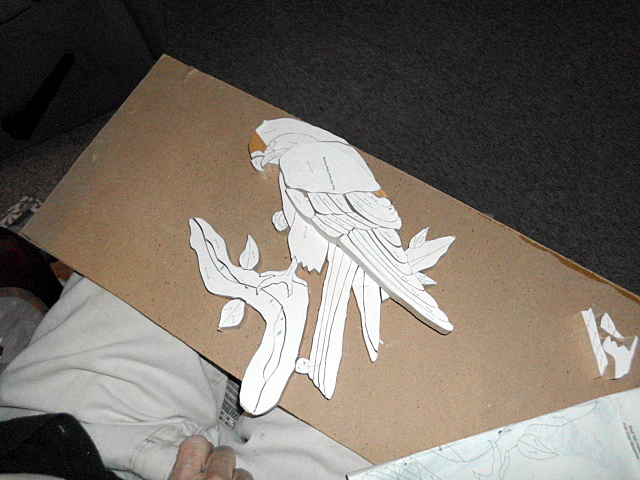
We have a friend who is a licensed trainer of Raptors.  The trainers find wounded birds or young that have lost their parents and rehabilitate them to be released again in the wild.  Bill thought he would make a wood plaque in Intarsia art of a Red-Tailed Hawk for the friend and is working on it right now.  So far, he has cut the many pieces out (approx. 65pcs) and is sanding each one to put them all together like a puzzle.
I caught Bill off guard as he settled in to check out the pieces-ha!  He has been cutting the pieces out for a few days in the shed but it was much too cold for him to stay out there any length of time.
  The pattern is a purchased one.  Copies are made so that you can attach it to the wood with spray adhesive.  Then when sawing the pieces out, you cut paper and all.  Now he is coming inside to remove all the paper and then will be sanding each piece before assembling the hawk.
Note the wing on the upper corner of the board on his lap.  This will be added to the figure of the hawk making it 3-dimensional.


In this picture, the wing is placed on top to show you the depth
of the figure.
Before the hawk can be completed, all of the paper will be removed from the pieces and they will be sanded and slightly beveled. Next they will be stained in different hues to assimilate the colors of the wings as closely as possible. Then the many pieces will be glued together in a mosaic* on a board backing of the same shape.

I will take pictures as the figure progresses.  I cannot wait to see the result!

*Intarsia comes from the Italian word for Mosaic.  The patterns for Intarsia woodworking are put together much like mosaics.  It is very time consuming and requires a great deal of skill.

For pictures of our backyard wildlife and Winter poetry, please visit my Kerrie's Korner, SC site. http://kerrieskorner.blogspot.com

Thank you for coming and come back again soon!

♥KERRIE♥
My Krafty heart to yours....