KRAFTS AND MORE!

Contents of this blog: Original hand crafted wood items, crochet, sewing, knitting, painting, drawing and also some How to's and craft tips thrown in! Enjoy!

Sunday, August 29, 2010

Golden Autumn is coming....

Golden Autumn is coming soon! And my crafty mind is whirling-ha!  A little gold craft paint and some materials from nature and I have instant fall decor!  Here is a little cluster of leaves that fell from the Live Oak tree in the neighbor's yard.  It even had the acorns attached.  I painted the leaves front and back with gold acrylic paint and gave the acorns a touch of orange color.


When we were on our trip to Auburn, NY, I picked up these dried plants from the field across the road from the house we stayed in at the Lake.  I do not know the name of them but an insect causes these round galls to form and they make great decorations for fall bouquets or just in a floor vase all by themselves.

Dried thistle can also be used and I also picked some of them but need to spray paint them with gold as it is impossible to paint them with a brush-ha!
See what you can gather up to give a touch of paint and warm your home for fall.
Thanks so much for visiting and do come again soon!  Check out my Kerrie's Korner SC blogsite to see the lovely butterfly house my hubby made and painted!

Tuesday, August 17, 2010

Vintage Utensils

Do you have vintage utensils that have sentimental value like I do?  Or do you just like picking them up at garage sales because they remind you of when you were little?  I have a little bit of both.  I have this one spatula that was my Mom's and I couldn't part with it.  But it had no ethereal value whatsoever.  So one day I decided to paint on the handle with acrylic paint, nothing fancy, just a suggestion of farm buildings and trees and this was the result:

Here it is hanging on the wall near the stove area in the kitchen.  And then I had an old wood handled can opener that I picked up at a sale.  I also painted a mountain scene on it and this is how that came out:
To finish off, I had hubby varnish the handles and that brought out the colors nicely and the detail.  This is such a fun project and if you are a good painter, you could paint a little spray of flowers on the handles or sayings with vine and flowers, use your imagination.  These little touches make a vintage kitchen utensil into a keepsake and even a housewarming gift!  If you try this, please send me a picture as I would love to see your creations! 
Thanks for looking and come back soon!  If you like this post you may also enjoy my other blogs: http://beaver-kerrie.blogspot.com/ TWO HAPPY and http://kerrieskorner.blogspot.com/  KERRIE'S KORNER, SC

♥KERRIE♥

Saturday, August 14, 2010

Crafting tips and cards

Happy Saturday to you!  I have updated my other blogs and pls. visit when you can.  Links are in the sidebar for Kerrie's Korner, SC and for TWO HAPPY.
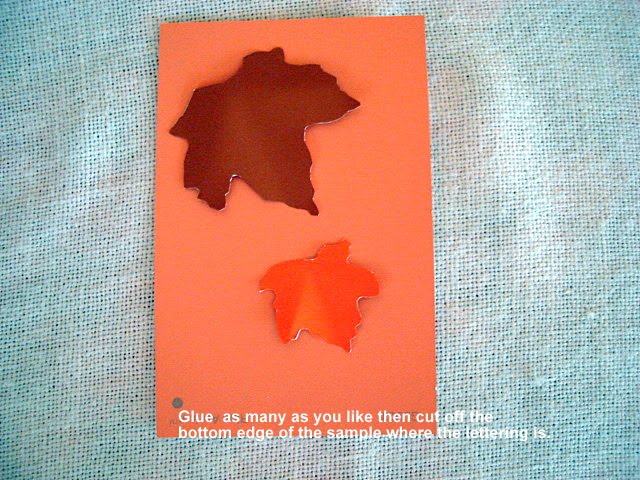
Today I want to share the great ideas for making your own cards.  I pick up paint samples whenever I visit Lowe's or Home Depot.  They have such a great variety of colors and textures.  I use them for cutting out flower petals and for labels on my home made greeting cards .  I will show you below.  I always save cards sent to me that have see-through designs and then in turn use them for templates to cut shapes for my cards. I use an old ink pen that has run out of ink to trace with and that way you do not have to worry about Ink or pencil marks on your cut-outs.


If you enjoyed this little tutorial, please leave a comment and I will work on some others for you.
Thanks for visiting!  And check out my other blogs - links are in the sidebar.  Have a wonderful weekend!

Monday, July 19, 2010

Doily with Caligraphy Saying Framed

Here is a great little gift to make or purchase from my shop!  I have taken a little lace ecru doily, added a little saying in Caligraphy and framed it.  I love the simplistic yet elegant touch to this little framed Victorian type keepsake!  You can buy a finished doily or better yet, use one you have crocheted yourself.  This one has a butterfly detail and I bought it long ago.  The lettering was done with a Caligraphy pen.  The frame is metal and gives the illusion of marble. 


This would look lovely on a table or hung on the wall.  This item is priced at only 10.00 plus 4.95 S&H.  Combined with another item from my Etsy Shop and the postage is free! 
As always, thank you for looking and do come again soon!  Please visit my other blogs and my Etsy Shop.  Thank you!


Kerrie


Crepe Myrtle blossoms today....

Tuesday, July 13, 2010

Teddy Bear by Kerrie

HERE IS MY DARLING KERRIE BEAR!!*
I have been making these bears since the 1970's for friend and family as well as to sell in a little shop I owned in my hometown.  They are made with unbleached muslin, polyfiberfill stuffing, hand embroidered face and satin bow.  This one is for a little girl named Nina and I have put her name on the red heart that the ribbon is hiding.  So these can be personalized.  Bear is completely washable and dryer safe.  These are not only good for little ones but teens like them for an Autograph Bear for their friends to sign.   Mine is autographed on the back side by me, the maker :^)

The Kerrie Bear is semi posable with floppy arms and legs.  He or she is 18"from ear to toe tip and 13" from paw tip to paw tip.  Can be dressed in infant clothes. This is a really fun and cuddly bear!
The pattern is difficult in that all the arms and legs have to be stuffed and pinned inside of the torso and then pulled back through the neck opening before stuffing the body, and adding the head.  I hope you enjoyed seeing my little bear.  If you would like to order one with someone's name on the heart, please e-mail me.  I hope to have some available made up for my Etsy Shop (link in sidebar) very soon and I can personalize at the time of purchase by adding the name on the heart.
Thank you for visiting as always and do visit my other blogs!
                                                     
I love crafting, come back soon! Have a wonderful Day!
Kerrie
*These bears are priced at $20.00 plus postage  and handling.

Tuesday, June 29, 2010

Cathedral Window Quilt

This is my Cathedral Window quilt that I have been working on literally for years!  My Mom gave the pattern to me in the 90's.  She passed in 2000.  It is all sewn by hand and not made in the new quick pattern some others use.  I can give you an easy way to do one if you care to have a pattern.  Please leave a comment.  Anyhow this pattern is made from 4 small squares joined to make one large one and then the printed material is sewn in by turning the overlap of contrast color on 4 sides.  Sewing by hand is very time consuming and I usually only worked on it in the winter when having it on my lap was not too warm-ha!  To finish, I just pinned on the rest of the lavender centers and will now make the window on them~about 40 squares to finish.  I really love this pattern and quilt and it has a lot of sentimentality sewn in because my Mom gave me the pattern.  Every stitch is sewn in love.  A detailed photo is at the bottom of this page.
   Yesterday after the night rain, the Gladiola blossoms had fallen over on their stem from the great weight of the flower.  Hubby clipped one and brought it in the house for me (smile).  One blossom fell off and I put it in a little vintage candy glass boot near my computer so I could enjoy it for the day.

Thank you for visiting and come again soon and often.  And if you would like me to post the pattern for a simpler version of the Cathedral Window pattern, just comment.

♥Kerrie

Sunday, June 27, 2010

LOVE MY YO-YO QUILT!

LOVE MY YO-YO QUILT!  it only took about 8 yrs. to get it all together-ha!  My Mom (who passed in 2000), my sister, my daughter and I all made Yo-yo's through the years of the peach and pretty printed materials.  I was not sure what I would do with them but had seen one in magazine that had been sewn together with no backing  and used as an overlay on their bed spread. 
 I decided to back mine and actually used heavy linen shower curtain material to back it.  This made it so heavy that I did not need batting at all.   Every yo-yo is hand stitched and sewn onto the backing .  Then Yesterday, I spent the whole afternoon machine stitching in rows over all the yo-yo's at their radius.  I still need to do some hand sewing here and there but I am really pleased with the finished Quilt which will be going on my 4-poster bed as a topper. 
  Thank you for visiting and please leave a comment!  For my MONSTER cucumber pictures, please go to http://kerrieskorner.blogspot.com/

♥Kerrie