KRAFTS AND MORE!

Contents of this blog: Original hand crafted wood items, crochet, sewing, knitting, painting, drawing and also some How to's and craft tips thrown in! Enjoy!
Showing posts with label book marks. Show all posts

Monday, January 9, 2012

Nifty Book Marks

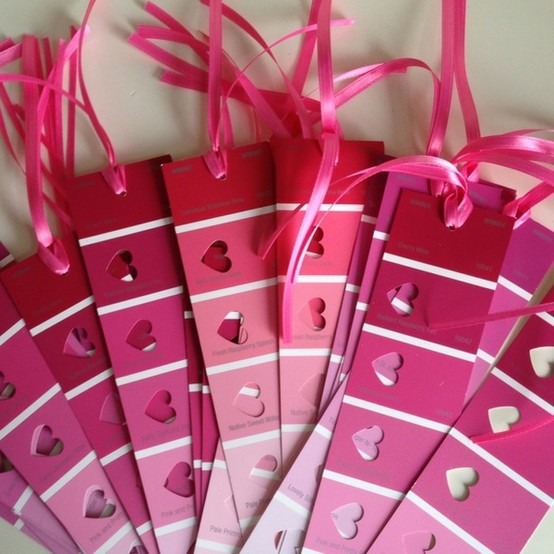
Are you familiar with Pinterest??  It is a site where people pin their favorite things in categories and if you like one of the pictures, you can repin it.  Several have repinned one of my Myrtle Beach ocean pictures.  Well, anyway, I found the neatest Book Mark idea on there.


These are made with paint samples!  For children, you can punch a heart out each time they finish reading a book, isn't that neat?  Or just make for friends and slip them in an envelope the next time you write or send a card to them.
  Punch a hole in the top for the colorful ribbon that will hang outside the book pages.  I just love this idea and can't wait to make some.


Here is one I made last year for a book plate.  Wanting to share again.  Right click on image to save and Print out on sticky backed paper that can be peeled to adhere to the frontispiece page of your books.


My Krafty Heart to yours...

Thanks for visiting today and come back soon!

Sunday, November 28, 2010

Gifts for my Granddaughters

Two of my granddaughters are in college, the same college.  One is a Freshman this year and the older one is a Junior.  They are very creative, they are involved in music, writing, drama and much much more!  This year the Oldest one has been the stage manager for several plays presented to the public.  The Younger one helped with Production.  Since they both loved theater, I decided to make them something simple that they would appreciate and came up with these bookmark/ornament for them both.
   I drew a Theater Mask of Comedy and Tragedy, colored it with my colored ink pens and cut it out in an oval. 
   I put it between 2 pieces of cellophane I had saved from a greeting card.  I cut the oval around the picture. 
   I punched a hole for a ribbon and reinforced the hole with 2 reinforcers on each side.  
   I used fabric ribbon to make the tie.
  The envelope is just a standard white and I wrote the name on it and drew a little ink bottle as Kelsey is a writer.  She wrote an entire autobiography in 10th grade!  Both girls want to be teachers.

I did the same with Sarah's but changed the colors of the ink to purple and lavender.  And on her envelope I put the quote marks as music notes as Sarah is a violinist, pianist, plays guitar and sings!!

I will use these as Money holders for Christmas and they can be used as bookmarks or on the bulletin boards in their dorm.  They even get to share the same dorm room!

You can find Drama masks on line to give you an idea and if you cannot draw yourself, there are many that are royalty free graphics that you could print and use.  What are your children and/grandchildren interested in?  This is a great way to make your own Money card holder with an added personal touch!

2.  The best way to make Ribbon Roses:

   Buy Ribbon with wire in it. 
   Strip a little of the fabric away from the wire on one side of the ribbon. 
   Then Pull the wire and ribbon away from each other as though you were     gathering a piece of material. 
   When you have enough gathered to twist around itself to form a flower, wrap the wire around the gathered base and pull tight.

The pink Ribbon I had already made up but today I bought the red and was happy with its result.  I pinched each of the rows of petals just a little to get the desired result.  I liked the way this ribbon was darker on the borders as it looked like natural rose shading.

Come back soon and I hope you are inspired to make something.  There is such gratification in seeing a project that you have completed
and given as a gift.  There is so much pleasure derived from giving...

Blessings!

♥KERRIE♥
My heart to yours...

Saturday, May 15, 2010

Free Template and Recycle Book mark

GOOD MORNING AND WELCOME! Here is a free template for flower petals and gift tags that you can use on your hand made cards and gift tags.  Also, a picture of a bookmark made by cutting up and recycling greeting cards.  You can enlarge the template after copying to your computer while printing it out.  Just choose the size you want and print.  The flower shapes can be layored and the tags just need to have holes with a hole punch to add a ribbon.  You can cut from colored scrap book paper or any other card stock, etc.
The book mark was cut from a greeting card.  I save any that I receive if they look as though I can use them for bookmarks, craft tags or incorporate parts of them into my own card making.  This is a great way to recycle and saves you money.  You can even print this bookmark out and use it.  Just paste this image on a heavier paper and write a personal note on the back.  You could also punch a hole with a hole punch and add a ribbon.  When you send a personal note or letter to a friend who loves reading, this would be a nice little surprise in the envelope!
Thank you for visiting this lovely Saturday and please drop in to my other blogs for nature pictures, birds, poetry and much more.  Links are in the sidebar.  I appreciate your visits and comments!

Kerrie ♥